Weekends are the most refreshing part in our lives. And what would be more satisfying than spending a weekend, making some cool easy homemade crafts, as I did this time !! When it comes to gifting someone, these handmade stuffs are appealing too. On this occasion of Rakhi, let us channel our creativity to learn how to make easy homemade rakhi step by step and surprise our brothers. Also learn making pom pom rakhi effortlessly at home.
A brother-sister relationship is unparalleled . ‘Raksha-bandhan’ is a popular Hindu festival which celebrates this virtuous relation. On this festival sister ties a ‘ simple rakhi ’ on her brother’s wrist. In return, brother promises to protect her all through .
What is a Rakhi ?
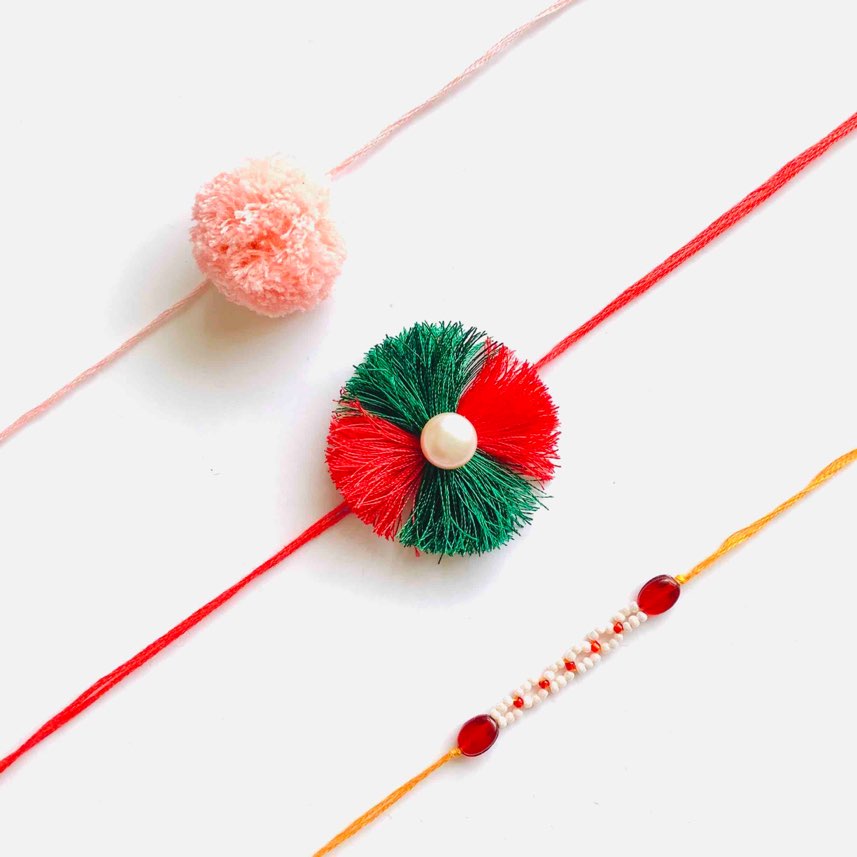
Basically a simple rakhi is crafted from thread. A variety of colourful and beautiful rakhi are readily available in market close to rakhi season. Here I am sharing 3 super-simple, super-quick, super-fun and extremely easy homemade rakhi ideas. These simple rakhi designs include pom pom rakhi , beaded rakhi and silk thread rakhi. You must try these on this rakhi season.
EASY HOMEMADE RAKHI IDEAS – 1 :
Pom Pom Rakhi
If you are willing to learn simplest and easiest homemade easy rakhi ideas then go for a pom pom rakhi. It takes hardly few minutes to prepare. Moreover pom pom rakhi is an overly simple rakhi and is pretty cute too.
Requirements :
Only 3 basic materials are needed to make a cute Pom Pom rakhi
- A yarn / thread ( peach colour )
- A pair of scissors
- A match box/ ruling scale
12 Steps :

1 . Choose a soft yarn or else a thick embroidery thread. I have taken a peach coloured embroidery thread as in the picture. It is handily available in any nearby store. Light coloured thread or wool suits best for pom pom rakhi .
2 . Roll the yarn/ thread to multiple layers around a matchbox/ ruling scale like shown in figure.
Alternatively, keep your index and middle fingers of left hand straight and closely apposed. Wrap the yarn/thread around these 2 fingers.
3 . Remove the roll by sliding over the ruling scale/ matchbox/ fingers.
4 . Use another thread to tie it at its midpoint with a single tight knot like in the image.
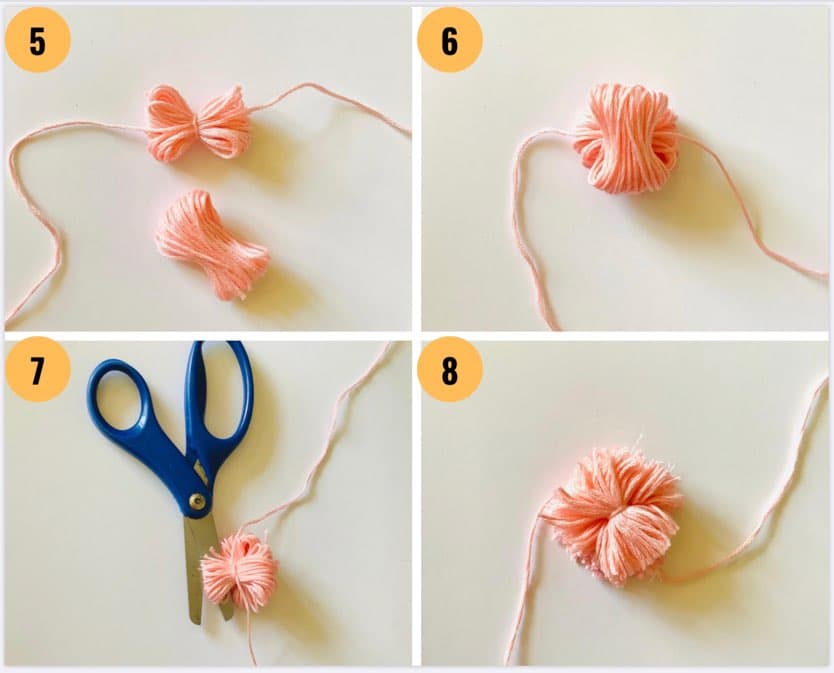
5 . Form another such roll.
Remember that more layers are added to the roll, fluffier the pom pom rakhi looks.
6 . Keep the second coil of thread at the centre of first one. Align its length perpendicular to the length of first roll as depicted.
7 . Further tie it firmly with 2 knots.
8 . Cut the folded ends of these bundle of yarn/ thread with a pair of scissors.
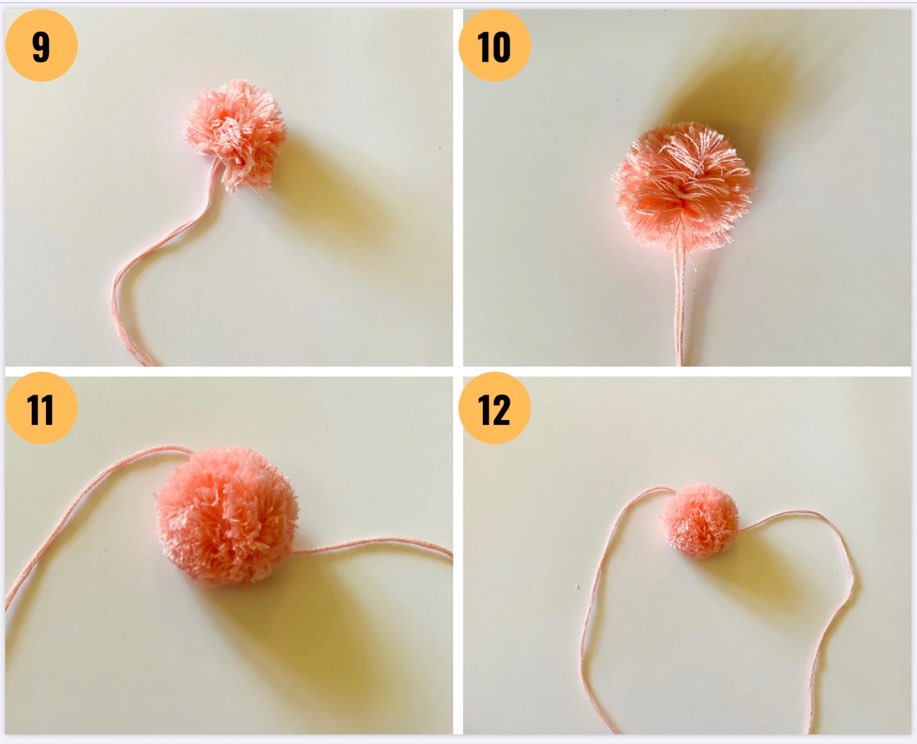
9 . Now brush it with a tooth brush gently such that the individual strands of each yarn separates. This imparts a more fluffy and bushy look to the pom pom rakhi.
Be careful and be mild while doing so. Always hold at centre of the knot while brushing, in such a way that threads don’t come out.
10 . Trim the ends to give it a spherical shape.
11 . Take some time for final touch up.
12 . Your adorable pom pom rakhi is ready
You can choose whatever colour you prefer. Besides, you can use a mix of different coloured threads in a single pom pom rakhi. However withhold from too dark colours.
EASY HOMEMADE RAKHI IDEAS – 2 :
Beaded rakhi
Another example of is trendy and easy homemade rakhi is beaded one. Colourful beads can be put together in various ways to design infinite numbers of patterns. Here is the simplest bead pattern, that you are absolutely going to like.
Requirements :
Most wonderful part about this simple and easy rakhi is, you need only 3 basic things to get started.
- A thread / yarn ( yellow )
- Few beads ( white and red )
- Needle
12 Steps :
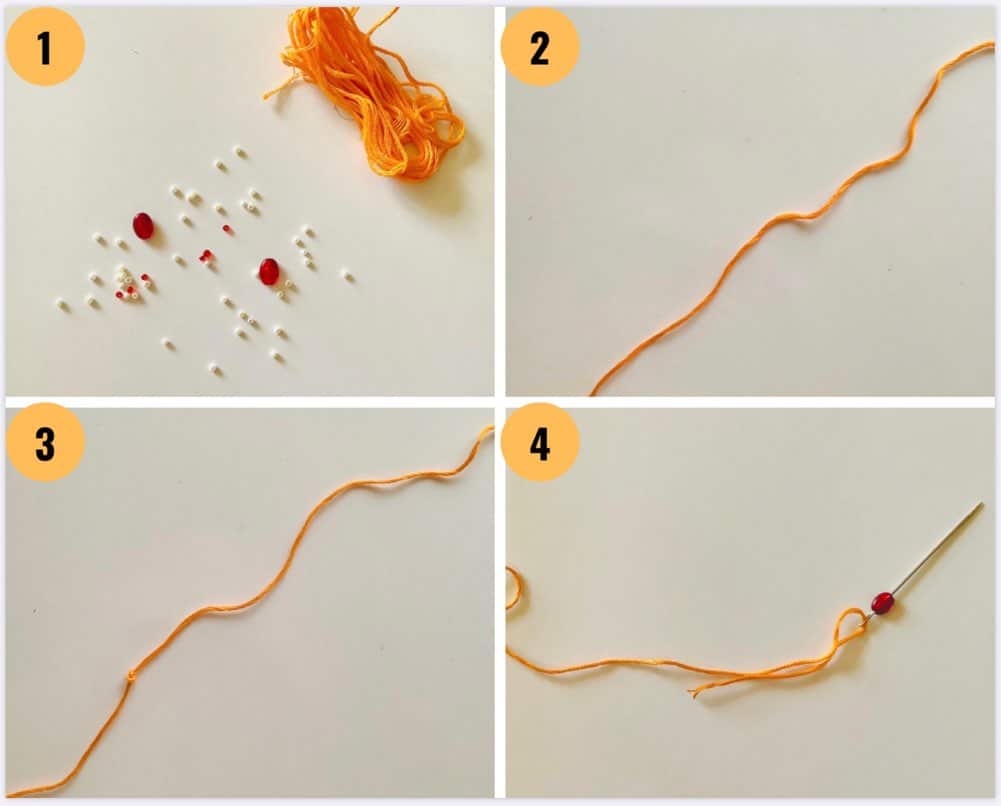
1 . Pick out few colourful beads of your choice. Herein I have chosen white and red beads.
2 . Take a yarn or a thick thread. I went for a piece of yellow embroidery thread here.
3 . Fasten a knot, not exactly at centre but few centimetres to its left.
4 . Now insert right end of thread into a needle. Slide the oval bead into this needle.
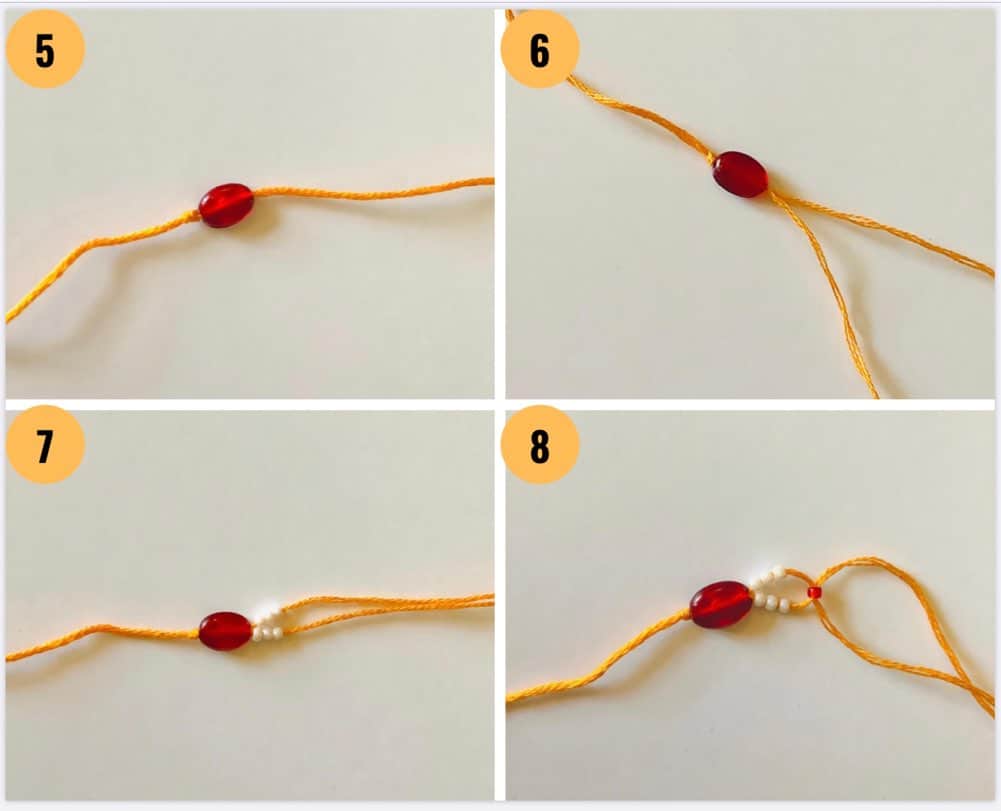
5 . Push this red oval bead across the thread so that it lies close to the knot, on its left.
6 . Split the thread at right end to 2 halves.
7 . Insert 3 white beads in each of these strands from right end as displayed.
8 . Take a small red bead and insert the 2 split threads through its hole in opposite direction, one by one. The threads should remain in a crossed manner as shown. It is comfortable and less clumsy if you use needle for this step.

9 . Next insert 3 white beads in each strand ( same as step 7 )
10 . Place another red bead ( same as step 8 )
11 . Now repeat step 7 and 8 , till you construct a good length of beads.
12 . Last in order, insert a red oval bead and fix a knot just to its right. Your beaded pretty and easy homemade rakhi is all prepped.
You can certainly customise thousands of varieties of such beaded simple rakhi by mixing and matching beads and threads. Furthermore you can invent a new pattern of arrangement of beads as well.
EASY HOMEMADE RAKHI IDEAS – 3 :
Silk thread rakhi
Art and crafts of silk thread are quite sought-after these days.
If you want to know how to make beautiful and easy homemade rakhi that is vividly colourful and eye-catching then silk thread rakhi is the best choice. It has a characteristic traditional touch as well. Steps are little bit similar to pom pom rakhi .
Requirements :
It is the best way to make rakhi at home easy and beautiful. this simple homemade rakhi requires just minimum materials as below.
- Silk thread ( red and green )
- Scissors
- Gum
- A stone/ bead / sequin
- A matchbox / ruling scale
12 Steps :

1 . Pick silk threads of 2 different colours. Over here, I have opted for red and green.
2 . Wind one thread ( green ) encircling a match box or around any such thing multiple times.
Make sure to add a thick layer of thread.
3 . Slip it from match box.
4 . Tie it at centre as demoed.
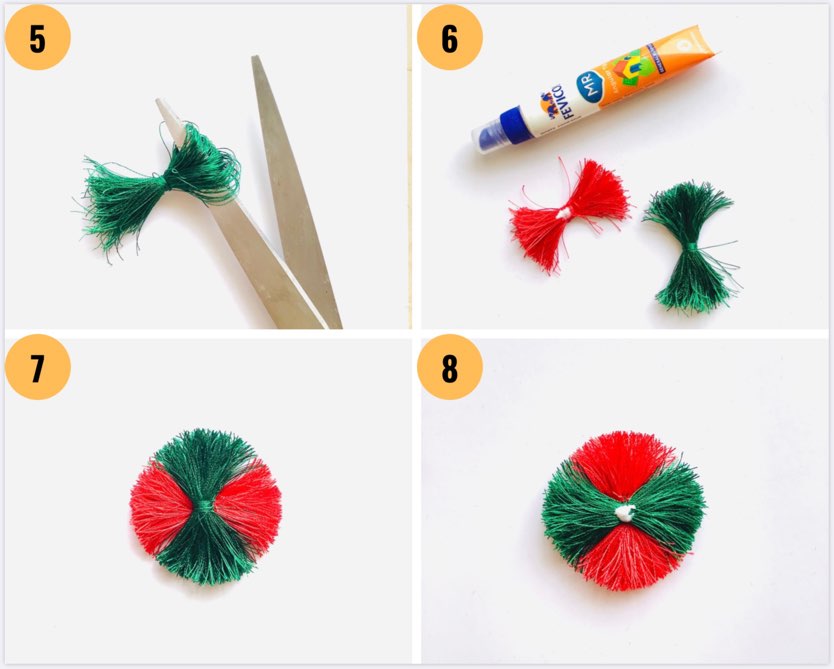
5 . Cut both ends of this roll. Now the shape would resemble a bow.
6 . Likewise repeat the same with another thread ( red ) to form a similar bow. Following this, put gum at centre of one such bow.
7 . Place centre of second bow over this gum, so that both bows are perpendicular to each other. Now trim the ends so as to shape a circular outline.
8 . Apply a little gum at centre of this circle as shown.
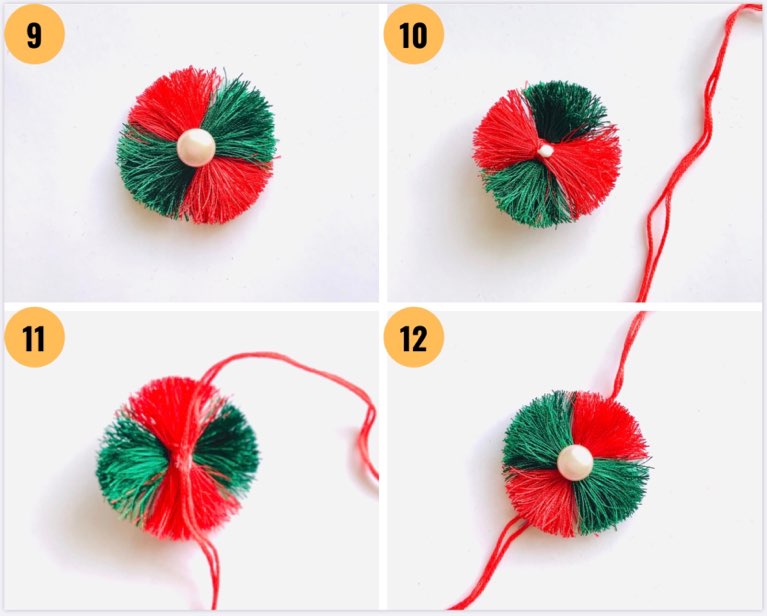
9 . Stick a stone / sequin / bead to it. Here I have handpicked a pearl like bead as it looks stunning with silk.
10 . Put some gum on exact opposite side, where bead is attached.
11 . Glue a double thread / yarn neatly to it.
12 . A simple yet gorgeous silk thread handmade rakhi is all set.
Winding up
It was really fun to attempt how to make easy and beautiful rakhi at home on weekend. Especially pom pom Rakhi is my favourite. You too try it and let me know your experience to make easy rakhi at home. Is there any DIY project that you tried and enjoyed ? Leave your fun experience in the comment box below.
Share these simple home made rakhi ideas with your friends and family. Subscribe to the blog to get notified and to read more such interesting posts.
Other popular posts :
Other related posts :



August 3, 2020 at 1:33 amFantastic ideas…keep writing
August 2, 2020 at 3:45 pmleave ur original profession .. u ll kill it with ur art .. amezing skills..
August 2, 2020 at 1:09 pmwowww…..really awesome….nice ideas